
These instructions only apply to domains that are currently being hosted by CeraNet.
Preparation
- Please email support@cera.net ahead of time and provide the domain name of the account(s) that you wish to migrate.
- CeraNet will then import the domain name into your cloud space control panel along with any existing databases and email accounts. This is important to avoid the disruption of existing services.
- CeraNet will respond by email that the import has been completed and provide any other advice, if needed.
- You can then begin the migration of the web site whenever it's convenient for you. The migration does not have to be completed within any specific timeframe.
- However, once you complete the migration please contact CeraNet by email so that the legacy plan can be removed from CeraNet's servers.
Migration
- Sign In to the Control Panel
- Create Instant Alias.
- Click on the Domains icon.
- Click on the domain name that you are migrating - this domain will have been added by CeraNet.
- Click the Create Instant Alias link.
- Click the Save button
- An alias will now be created.
- Create Web Site.
- Click on Web Sites from the Hosting Space Menu.
- Click the Create Web Site button.
- Select the domain name for the site from the drop-down list. You may be prompted to select a Shared or Dedicated IP address.
- IMPORTANT - If you are not prompted to select Shared or Dedicated and the site requires SSL then you must stop and contact CeraNet before proceeding. SSL requires a dedicated IP address and if these options do not appear then the site will be created in a shared environment. CeraNet will need to assign the dedicated IP address before you can proceed.
- If you are prompted to make an IP address selection then choose Shared if the site does not require SSL or Dedicated if it does. You can choose the next available IP address if you select Dedicated. This can be changed later if you decide to add SSL to a site after its up and running.
- Click the Create Web Site button and the new site will be created.
- Publish Content Files
- If you plan to use the existing content from the legacy plan then follow these steps. If you are creating an entirely new site, skip to subsection 4.2.
- FTP into the legacy hosting plan from your local computer and download all the files onto your local computer.
- Create Cloud Space FTP Account.
- Click on FTP Accounts from the Hosting Space Menu.
- Click the Create FTP Account button.
- Specify the Username and Password. Click on the \ in the Home Folder option and a directory drop-down listing will appear - Expand the Root Folder, click on the folder which is named with the domain name of the new site. Check both Read and Write for Access Rights Options.
- Click the Save button
- Upload content files to cloud space.
- Open the FTP client on your local computer (i.e. Filezilla, Dreamweaver, etc.)
- Create a new FTP connection to the cloud space.
- Specify ftp.[domainname].ceranethost.com for the address (this is the Instant Alias created in step 3). The value for [domainname] should be the fully qualified domain that includes the tld but not a subdomain (i.e. 'cera.net' or 'ceranet.com').
- Specify the username and password configured for the cloud space FTP account.
- Copy the web site content files downloaded from the legacy plan to the cloud space. IMPORTANT: Copy all files and folders to the directory labeled wwwroot in the cloud space - wwwroot is one directory down from the Home Folder.
- Test web site.
- Open a browser and navigate to www.[domainname].ceranethost.com. Test your site thoroughly.
- If the web site does not work:
- Click on Web Sites from the Hosting Space Menu
- Click on the domain name link for the new web site.
- If you receive a ''page cannot be found'' or ''directory listing denied'' error then you likely need to update the list of default documents. You should specify the name of your home page as the first item in the Default Documents list.
- If you receive a scripting error then you likely need to change the .NET settings. Click on the Extensions tab. If you are using classic ASP then make sure it is enabled. If you are running .NET then you may need to change the framework version - by default, .NET 4.0 will be selected but many of our Legacy plans run on .NET 2.0 - if you are not sure you may want to try the different options. PHP is always enabled and there should be no reason to change that option.
- After making changes to the web site settings click the update button and re-test the site. If you continue to have problems please contact CeraNet.
- If you plan to create an entirely new site then proceed as you normally would. If you want to publish the content from the legacy hosting plan go back to subsection 4.1.
- If you are creating an entirely new site (i.e. Wordpress, Drupal, etc.) then you can proceed with the creation of the site. Go ahead and install Wordpress or other CMS through the web application gallery and develop the site.
- If you plan to use the existing content from the legacy plan then follow these steps. If you are creating an entirely new site, skip to subsection 4.2.
- Make site live.
- The final step to making the site live will require you to modify the DNS settings of the domain to point to the cloud space.
- IMPORTANT: DNS changes may take up to an hour to fully propogate. In the meantime, you can use the Instant Alias to access the site. Also, please note that some guests may be directed to legacy site and some may be directed to the cloud space during the propogation period.
- Select Domains from the Hosting Space Menu.
- Click on the domain link for the domain of the new web site.
- Click Edit DNS zone records
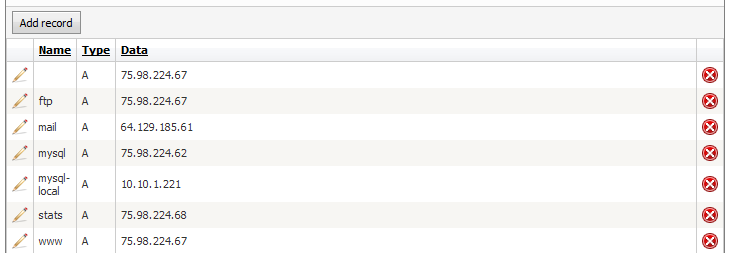
- The records with type 'MX', 'NS' and 'TXT' should not be changed. The 'A' record with the name 'Mail' should also not be changed.
- Delete the 'A' records for 'ftp', 'www', and ''.
- Add the records shown in the following picture. IMPORTANT - If you running this site on a dedicated IP address then speicfy the dedicated IP address assigned to the site for the '' and 'www' A records. Otherwise, for the shared option specify the records exactly as shown below.
Finally - Notify CeraNet by email that the site migration has been completed. Please call if you have concerns or need any help.